Creating UI using WPF |
For some plugins it can be vital to have some sort of user interface, this can range from simple notifications to full blown configuration dialogs or forms with data validation. Articy:draft itself is written using Microsoft's WPF and therefore it is obvious to use WPF for your plugin interface. When using WPF you can use it in almost any way you like using many features it provides.
Please note that this article is not an introduction to WPF, instead it will show you how you can prepare your plugin to use WPF, how your plugin and your interface can work together, and give you some small tips and tricks to use WPF and the MDK to its full potential.
Please be aware that it is not possible to add or change anything of articy:draft's existing interface. You can't add a new Flow object for example, or change how the toolbar is built. What you can do is to create a custom window and use WPF inside it anyway you like. |
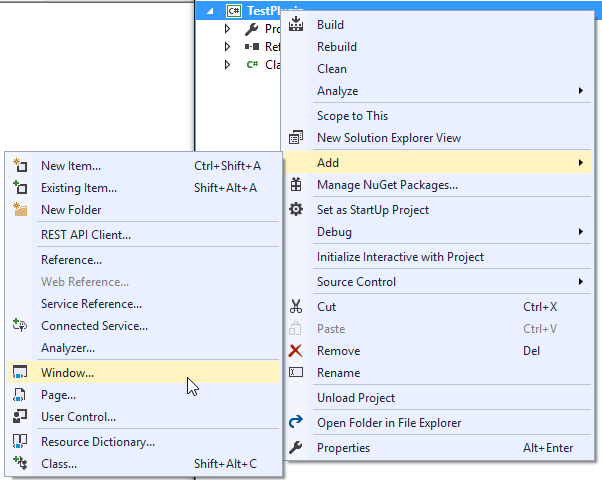
After you have setup your plugin project and added the MDK references, you are ready to add a WPF window. If you right click your project and click on Add you might notice that no WPF control can be added (Except UserControl) and only a Windows Forms window is available. If you have the option to add a WPF Window you can skip this section.

This is unfortunately an oversight in Visual Studio that we have to fix manually by modifying the project file, luckily for us this is only necessary once.
Locate your plugins *.csproj file in the explorer and open it in your text editor of choice. Inside the file you should look for the first block of <PropertyGroup>, it should look something like this
<PropertyGroup>
    <Configuration Condition=" '$(Configuration)' == '' ">Debug</Configuration>
    <Platform Condition=" '$(Platform)' == '' ">AnyCPU</Platform>
    <ProjectGuid>eabad453-c817-42b0-a484-bddf4afd5027</ProjectGuid>
    <OutputType>Library</OutputType>
    <AppDesignerFolder>Properties</AppDesignerFolder>
    <RootNamespace>TestPlugin</RootNamespace>
    <AssemblyName>TestPlugin</AssemblyName>
    <TargetFrameworkVersion>v4.5.2</TargetFrameworkVersion>
    <FileAlignment>512</FileAlignment>
</PropertyGroup>
Copy and paste the following xml fragment into this existing PropertyGroup:
<ProjectTypeGuids>{60dc8134-eba5-43b8-bcc9-bb4bc16c2548};{FAE04EC0-301F-11D3-BF4B-00C04F79EFBC}</ProjectTypeGuids>
So the final block should look something like this:
<PropertyGroup>
    <Configuration Condition=" '$(Configuration)' == '' ">Debug</Configuration>
    <Platform Condition=" '$(Platform)' == '' ">AnyCPU</Platform>
    <ProjectGuid>eabad453-c817-42b0-a484-bddf4afd5027</ProjectGuid>
    <OutputType>Library</OutputType>
    <AppDesignerFolder>Properties</AppDesignerFolder>
    <RootNamespace>TestPlugin</RootNamespace>
    <AssemblyName>TestPlugin</AssemblyName>
    <TargetFrameworkVersion>v4.5.2</TargetFrameworkVersion>
    <FileAlignment>512</FileAlignment>
  <ProjectTypeGuids>{60dc8134-eba5-43b8-bcc9-bb4bc16c2548};{FAE04EC0-301F-11D3-BF4B-00C04F79EFBC}</ProjectTypeGuids>
</PropertyGroup>
If you save the file and go back to visual studio, it should detect the modification and confirm to reload the solution. Now when you open the context menu again you should see the WPF Window.
After you have setup the project file (if necessary) you can just add a new WPF Window by clicking the context menu entry. This will not only add the necessary files to your project but also add any required assembly references.
Important
At the time of writing this article, I encountered a compile error after adding a WPF window

if the same happens to you, you need to add the System.Xaml assembly reference to your project. After that, compiling your project should be fine.
At this point we just have to figure out how we can open the window. This depends a bit on what you want to achieve, maybe your window opens automatically when a certain condition is met, or only when the user clicks on a button your plugin added. Whatever the case is, opening the window is very easy.
Window1 wind = new Window1();
Session.ShowDialog(wind);
The quickest and easiest way to open a window in a plugin is by using the general plugin toolbar to add a button that will show the window.
public override List<MacroCommandDescriptor> GetMenuEntries(List<ObjectProxy> aSelectedObjects)
{
    var result = new List<MacroCommandDescriptor>();
    if ( aSelectedObjects != null )
    {
        // normal context menu when working in the content area or navigator
    }
    else
    {
        var openWindow = new MacroCommandDescriptor()
        {
            RecordUndoRedo = false,
            ModifiesData = false,
            CaptionLid = "{p:$self}TestPlugin\\Show my Window",
            Execute = OpenMyWindow,
        };

        result.Add(openWindow);
    }
    return result;
}

private void OpenMyWindow(MacroCommandDescriptor aDescriptor, List<ObjectProxy> aSelectedObjects)
{
    Window1 wind = new Window1();
    Session.ShowDialog(wind);
}
When you start designing your wpf window for the plugin you will soon notice that your controls are styled after your operating system, not after articy:draft. The reason for that is that articy:draft only uses explicit styling. But the good news is that you can still use those for your own controls. So for all basic controls (Like TextBox, Button, CheckBox etc.) you will find accompanying styles following a simple naming schema:
<ControlType>Style
In other words you can find ButtonStyle, TextBoxStyle etc.
Colors
While we don't provide a custom skin for the window, you might want to change the background of the window to the articy:draft background color, you can do this by using the color directly as the Background
<Window x:Class="TestPlugin.Window1"
    xmlns="http://schemas.microsoft.com/winfx/2006/xaml/presentation"
    xmlns:x="http://schemas.microsoft.com/winfx/2006/xaml"
    xmlns:mc="http://schemas.openxmlformats.org/markup-compatibility/2006"
    xmlns:d="http://schemas.microsoft.com/expression/blend/2008"
    xmlns:System="clr-namespace:System;assembly=mscorlib"
    mc:Ignorable="d"
    Title="MyWindow"
    Background="{StaticResource FormBackgroundBrush}">
Some more colors to try out and use
FormBackgroundBrush
FormSecondaryBackgroundBrush
ControlNormalBorderBrush
ControlFocusBorderBrush
ErrorBorderValidationBrush
WarningBorderValidationBrush
PrimaryTextBrush
SecondaryTextBrush
TextDisabledBrush
Session and Databinding
Most of the operations that you can do are found inside the ApiSession object. When you have buttons in your UI you might have the need to access the ApiSession that is managed inside your Plugin class. To do that you could just pass the session to your window.
A slightly better way, depending on your use case is to create a container class, if you are familiar with MVVM: we are effectively creating a view model for our window. So a foundation for our container object could look like this:
class MyPluginData : INotifyPropertyChanged
{
    public MyPluginData(ApiSession aSession)
    {
        Session = aSession;
    }

    public ApiSession Session
    {
        get; private set;
    }

    public event PropertyChangedEventHandler PropertyChanged;

    protected void RaisePropertyChanged(string aName)
    {
        if(PropertyChanged != null)
            PropertyChanged(this, new PropertyChangedEventArgs(aName));
    }
}
To use this class we now assign it as a DataContext for our Window by writing
private void OpenMyWindow(MacroCommandDescriptor aDescriptor, List<ObjectProxy> aSelectedObjects)
{
    Window1 wind = new Window1();
    wind.DataContext = new MyPluginData(this.Session);
    Session.ShowDialog(wind);
}
And now you can see why we implemented the INotifyPropertyChanged interface, as this is a very important part for WPFs DataBinding. So any dynamic data you need to display in your UI you can expose in this class as a C# property. You can also access the Session object inside your window to call necessary API methods.
Loading and saving settings
If you write a configuration dialog that needs to store settings for your plugin you can use the previously created container class to store your settings. By utilizing JSON.NET (already part of the MDK installed references) you can very easily serialize your container class, but first let's make some adjustments, we need to make sure that serialization won't touch the Session property and we need to add a property to reflect our data.
class MyPluginData : INotifyPropertyChanged
{
    public MyPluginData(ApiSession aSession)
    {
        aSession = aSession;
    }

    [JsonIgnore]
    public ApiSession Session
    {
        get; private set;
    }

    private string mMyStringSetting;
    public string MyStringSetting
    {
        get{ return mMyStringSetting; }
        set { mMyStringSetting = value; RaisePropertyChanged("MyStringSetting"); }
    }

    public event PropertyChangedEventHandler PropertyChanged;

    protected void RaisePropertyChanged(string aName)
    {
        if(PropertyChanged != null)
            PropertyChanged(this, new PropertyChangedEventArgs(aName));
    }
}
We can now add methods to load and save inside our plugin derived class
public MyPluginData Settings { get; private set; }

private void LoadSettings()
{
    var settingsPath = Session.GetProjectFolderPath() + "Sessions\\pluginsettings.json";
    try
    {
        // load possible existing settings
        Settings = JsonConvert.DeserializeObject<MyPluginData>(File.ReadAllText(settingsPath));
        Settings.Session = Session;
    }
    catch (Exception)
    {
        // no settings found, so we create a fresh one
        Settings = new MyPluginData();
        Settings.Session = Session;
        Settings.MyStringSetting = "Default Value";
    }
}

public void SaveSettings()
{
    var settingsPath = Session.GetProjectFolderPath() + "Sessions\\pluginsettings.json";
    try
    {
        File.WriteAllText(settingsPath, JsonConvert.SerializeObject(Settings, Formatting.Indented));
    }
    catch (Exception)
    {

    }
}
The settings are written into the current open projects session folder. If no setting is found, a new one is created. The only thing left is to decide where to call those methods. Loading your settings should usually happen at the earliest possible occasion, for that we use the ProjectLoaded event.
public override bool ProjectLoaded()
{
    LoadSettings();
    return base.ProjectLoaded();
}
Saving is a bit more tricky and depends on the use case, but for a configuration in a modal dialog you can use something like this
private void OpenMyWindow(MacroCommandDescriptor aDescriptor, List<ObjectProxy> aSelectedObjects)
{
    Window1 wind = new Window1();
    wind.DataContext = new MyPluginData(this.Session);
    var result = Session.ShowDialog(window);

    // true means the used confirmed the dialog, false means he canceled it
    if(result.HasValue && result.Value)
        SaveSettings();
    else
        LoadSettings(); // overwrite the "in memory" changes with the previous save on the disk
}